WordPress 块开发我们之前已经聊过不少:从静态块到动态块,再到核心块的扩展,这些方法虽能创建功能块,但本质上仍是静态的——无法实时响应用户交互。
本文将介绍一种全新的块开发方式,借助 WordPress Interactivity API 创建交互式块。该 API 于 WordPress 6.5 引入,可让块实时响应用户交互,从而打造更吸引人、更动态的用户体验。
内容丰富,下面来看必要的前提条件。
使用 Interactivity API 前需要准备什么
Interactivity API 基于 React,因此需要具备基本的服务端 JavaScript 和 React 知识,以及 npm 和 npx 等构建工具的使用经验。此外,还需深入理解 WordPress 开发和 Gutenberg 块编辑器。
掌握必要技能后,需要一个本地开发环境来快速启动 WordPress 网站。建议使用 DevKinsta,这是专为 WordPress 设计的本地开发套件。只需几次点击即可搭建全新的本地 WordPress 站点,并可进行详细定制。
在 DevKinsta 中创建新 WordPress 项目时,可设置以下选项:
- 顶级域名:默认为 .local
- PHP 版本
- 数据库名称
- 启用 HTTPS
- WordPress 详情
- WordPress 自动更新
- 多站点
此外,还可从备份中导入现有的 MyKinsta 网站。
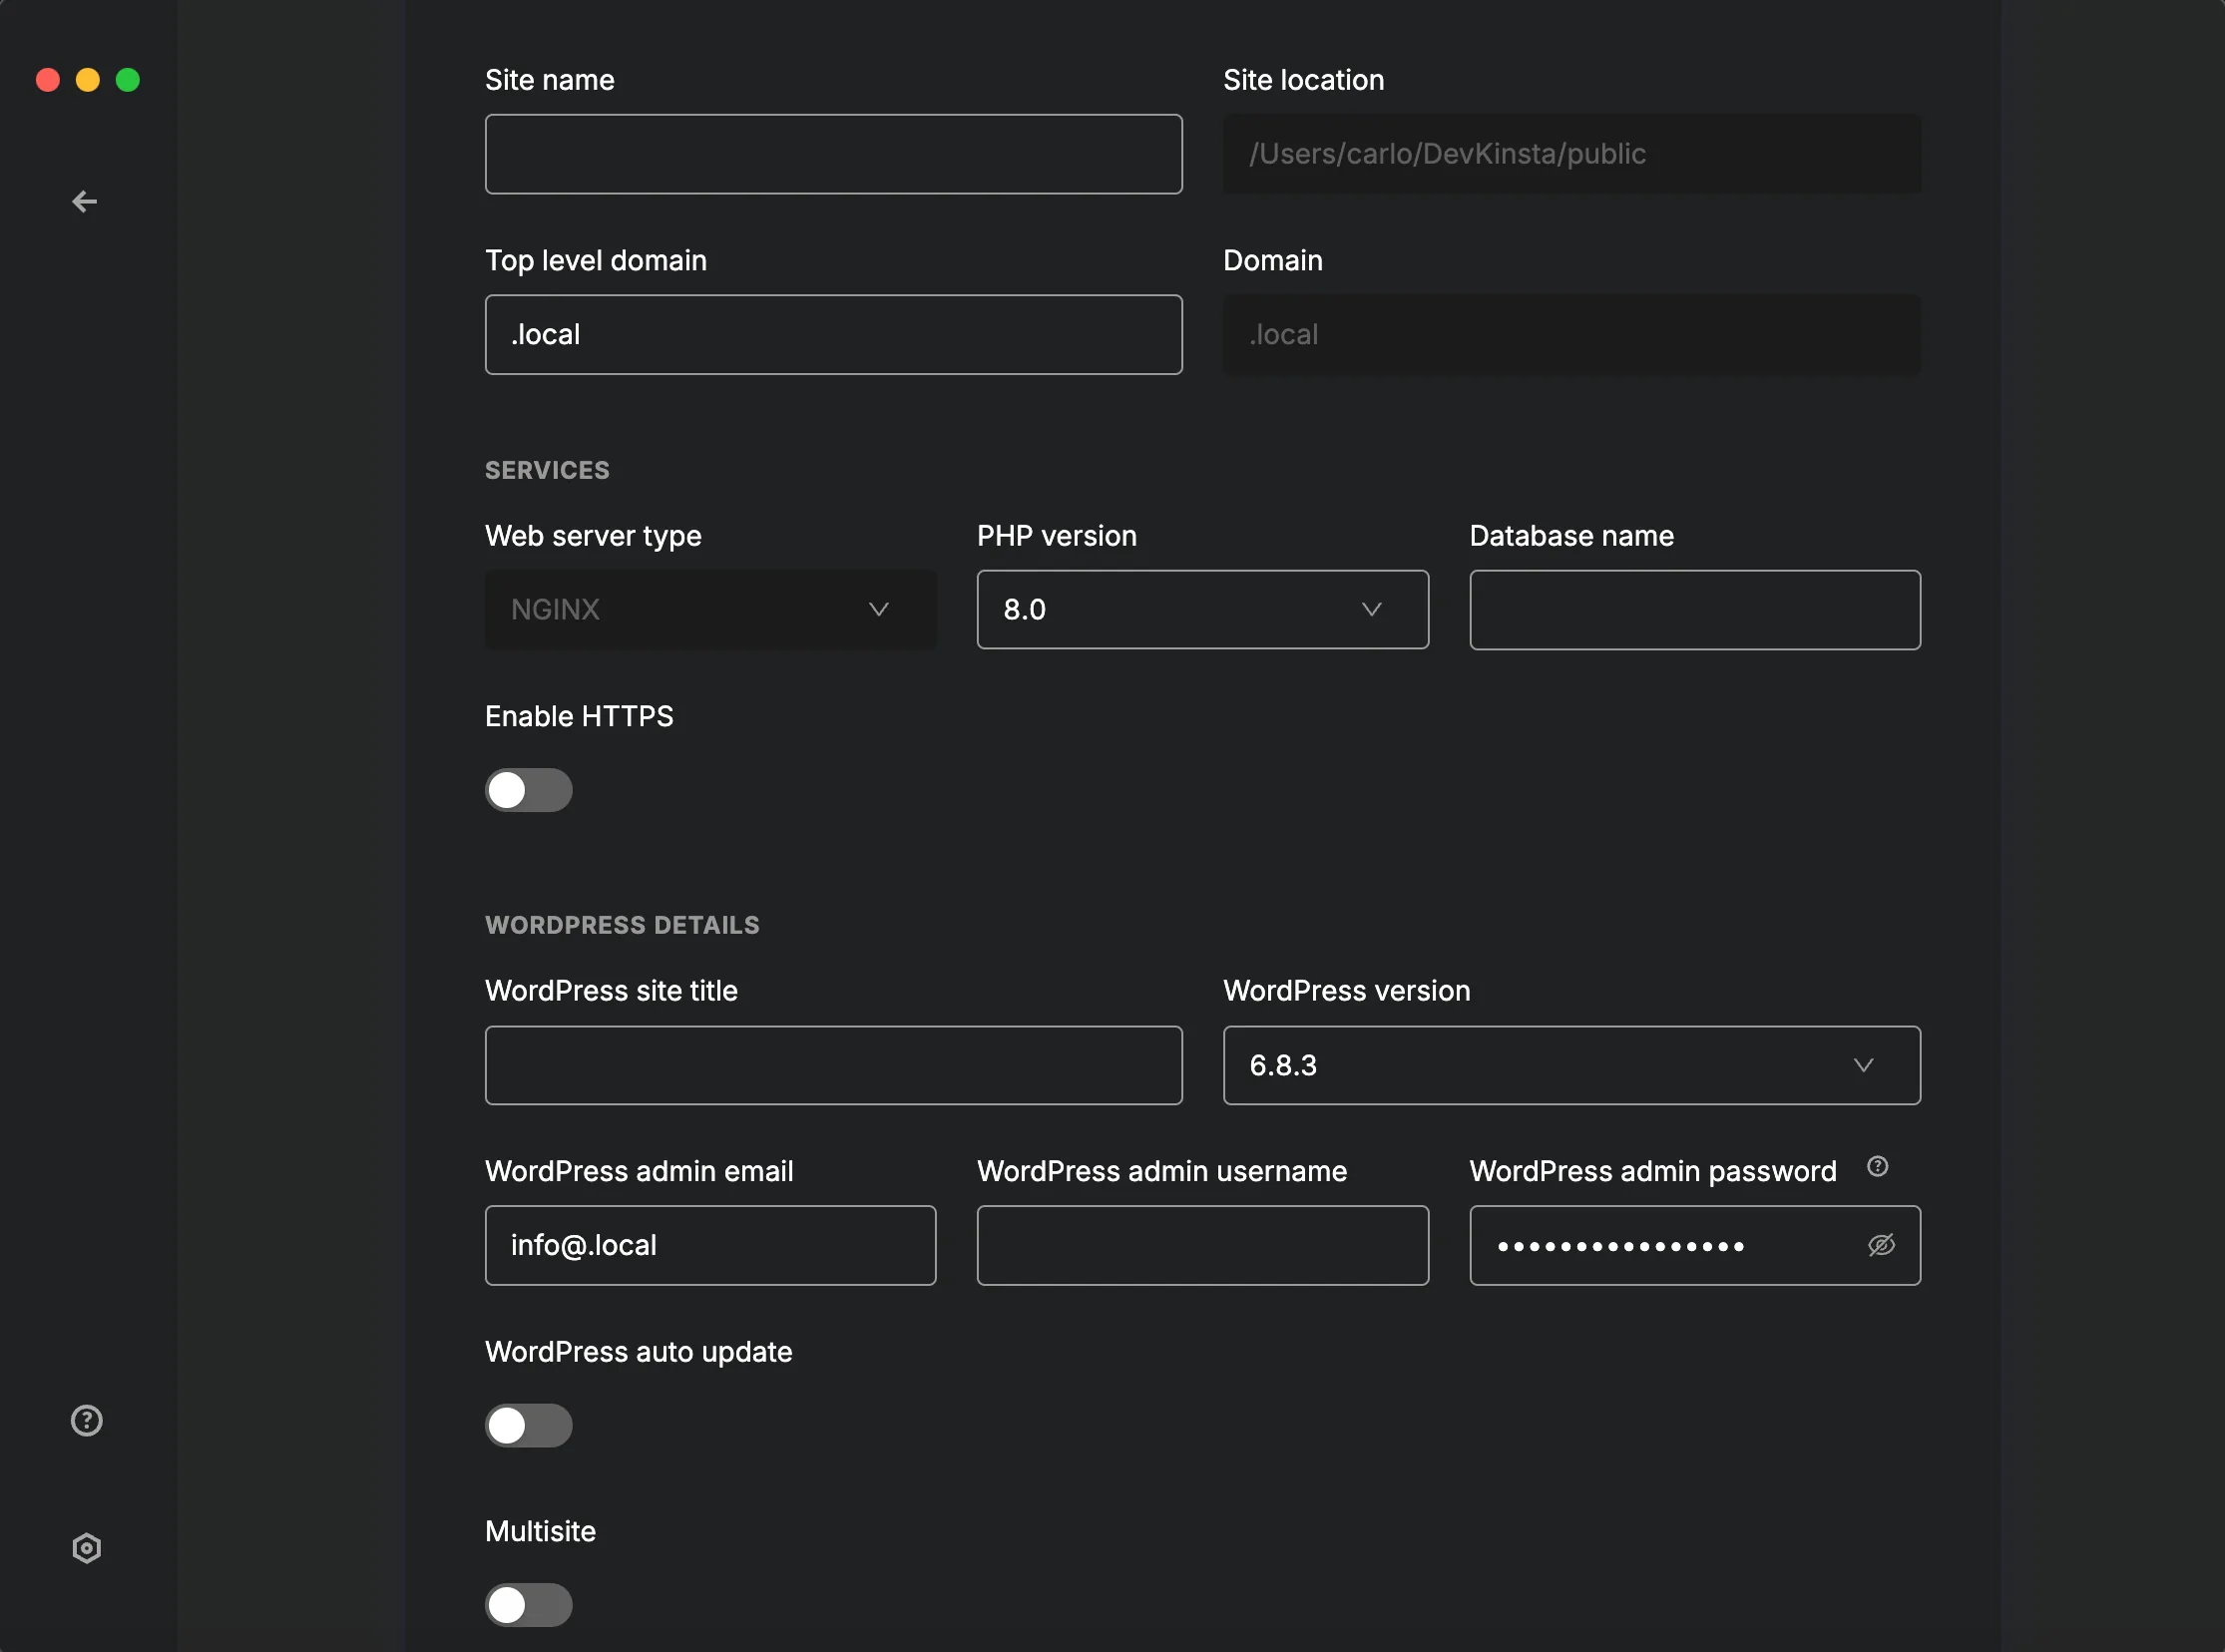
在 DevKinsta 中配置本地网站
什么是 Interactivity API?
Interactivity API 是 WordPress 原生 API,可为 Gutenberg 块添加交互性,为 WordPress 网站的文章和页面增添动态功能。这是一个轻量级、现代化的解决方案,采用声明式方法处理用户交互。
从零创建交互式块需要高级 PHP 和服务端 JavaScript 开发技能。WordPress 提供了创建交互式块的模板,无需在每个项目中重复造轮子:
npx @wordpress/create-block --template @wordpress/create-block-interactive-template
该模板包含创建交互式块的完整内容,还包括两个示例项目:切换当前主题的按钮,以及展开/折叠段落的按钮。
首先,打开命令行工具,进入本地 WordPress 安装目录下的 Plugins 文件夹,然后执行以下命令:
npx @wordpress/create-block your-interactive-block --template @wordpress/create-block-interactive-template
等待安装完成后,使用偏好的代码编辑器打开项目文件夹。推荐使用 Visual Studio Code,当然也可以使用任何熟悉的编辑器。
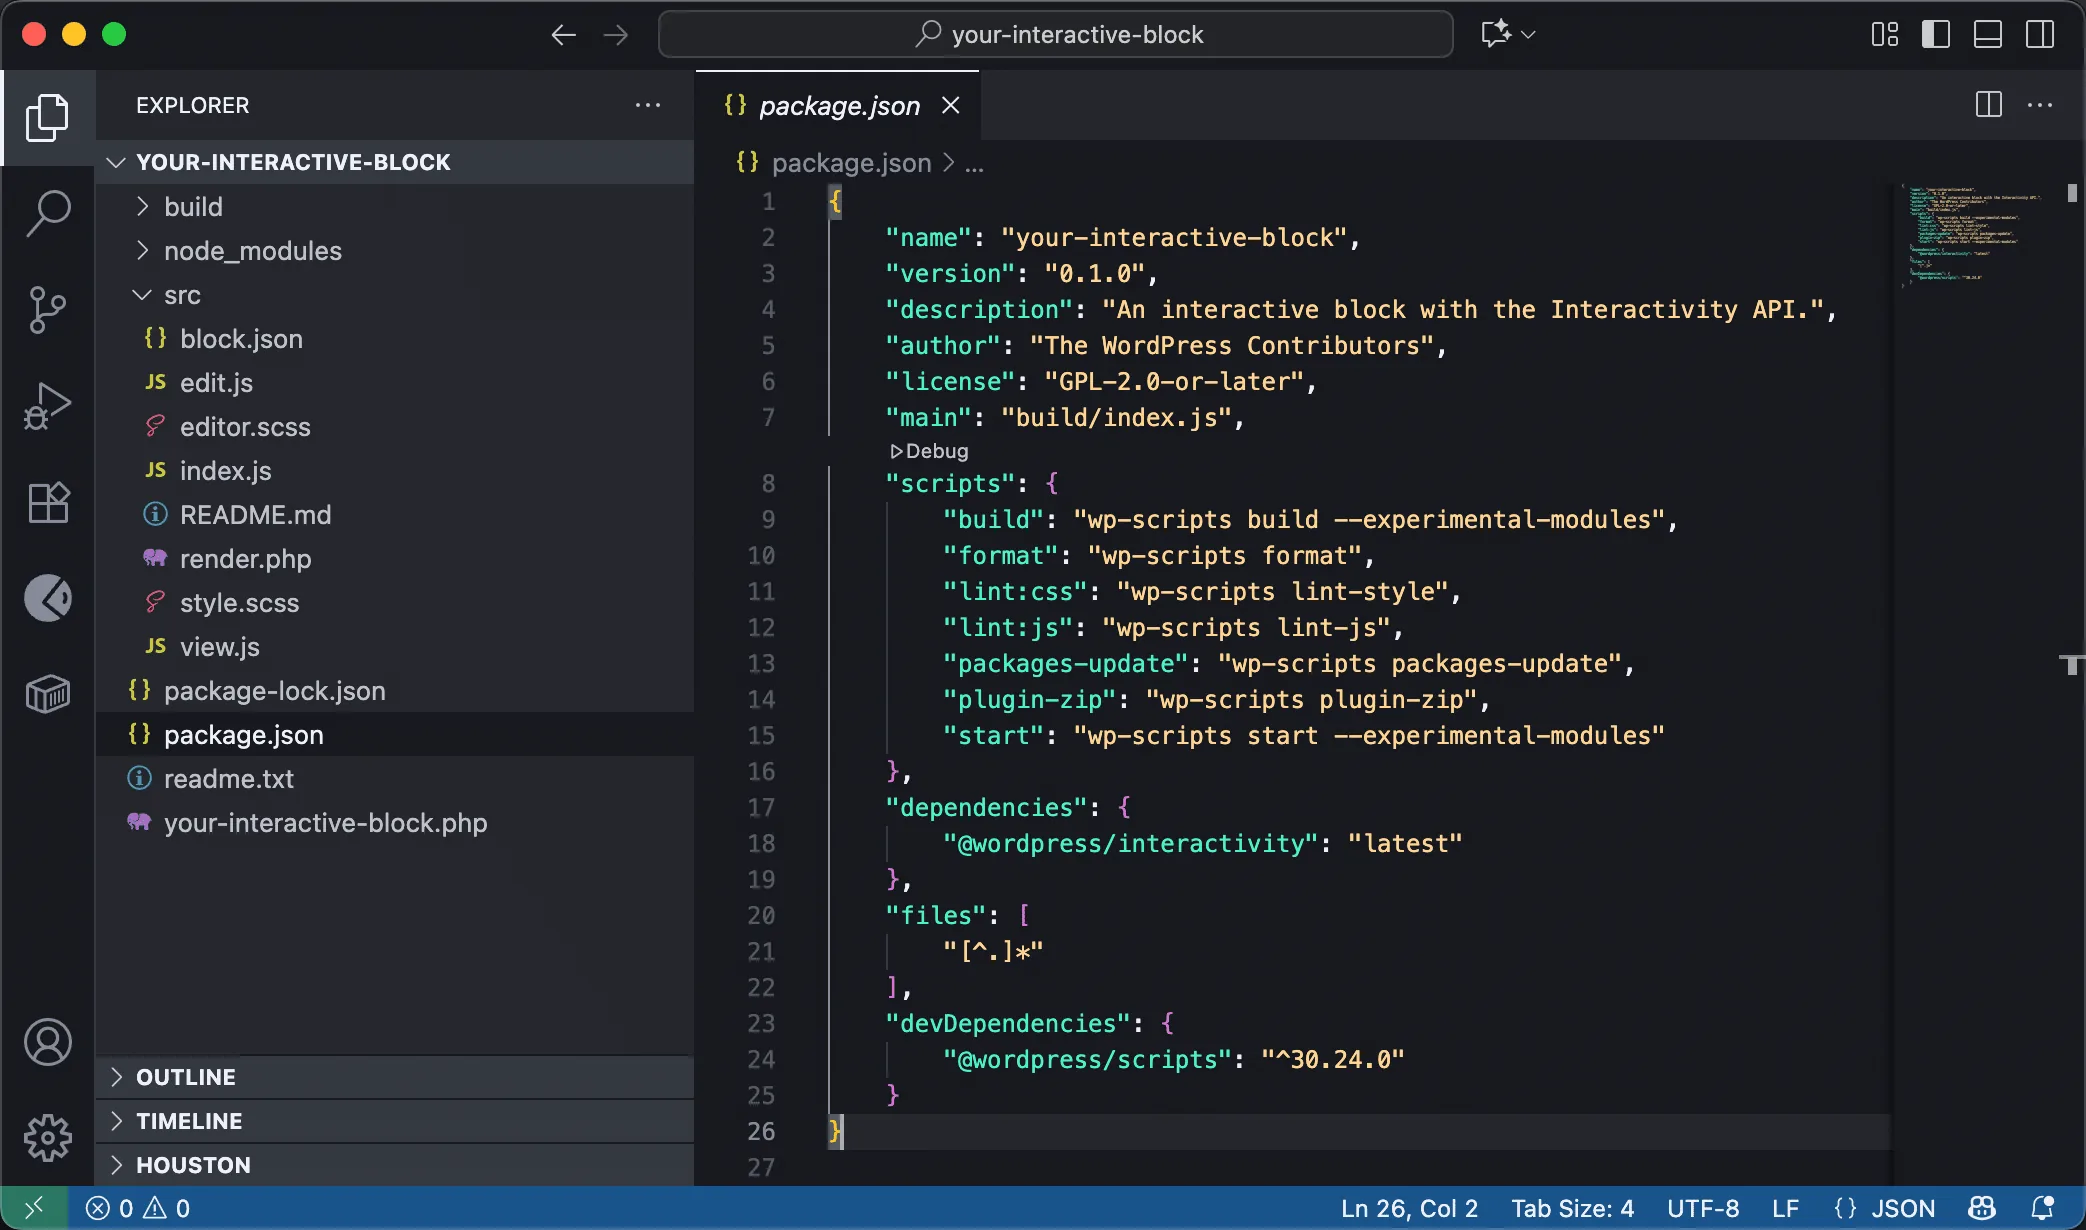
@wordpress/create-block-interactive-template 提供的交互式块项目
进入新插件文件夹,执行以下命令启动开发服务器:
npm start
此后,对块所做的任何更改都将在 WordPress 安装中实时显示。
接下来,在 WordPress 管理后台进入 插件 屏幕,激活刚刚创建的 Interactivity API 插件。创建一篇新文章或页面,然后在块插入器中搜索 Your interactive block,将其添加到内容中。保存文章并在前端预览,你会看到一个黄色块,其中包含两个按钮:第一个用于更改块的背景颜色,第二个用于显示或隐藏段落内容。
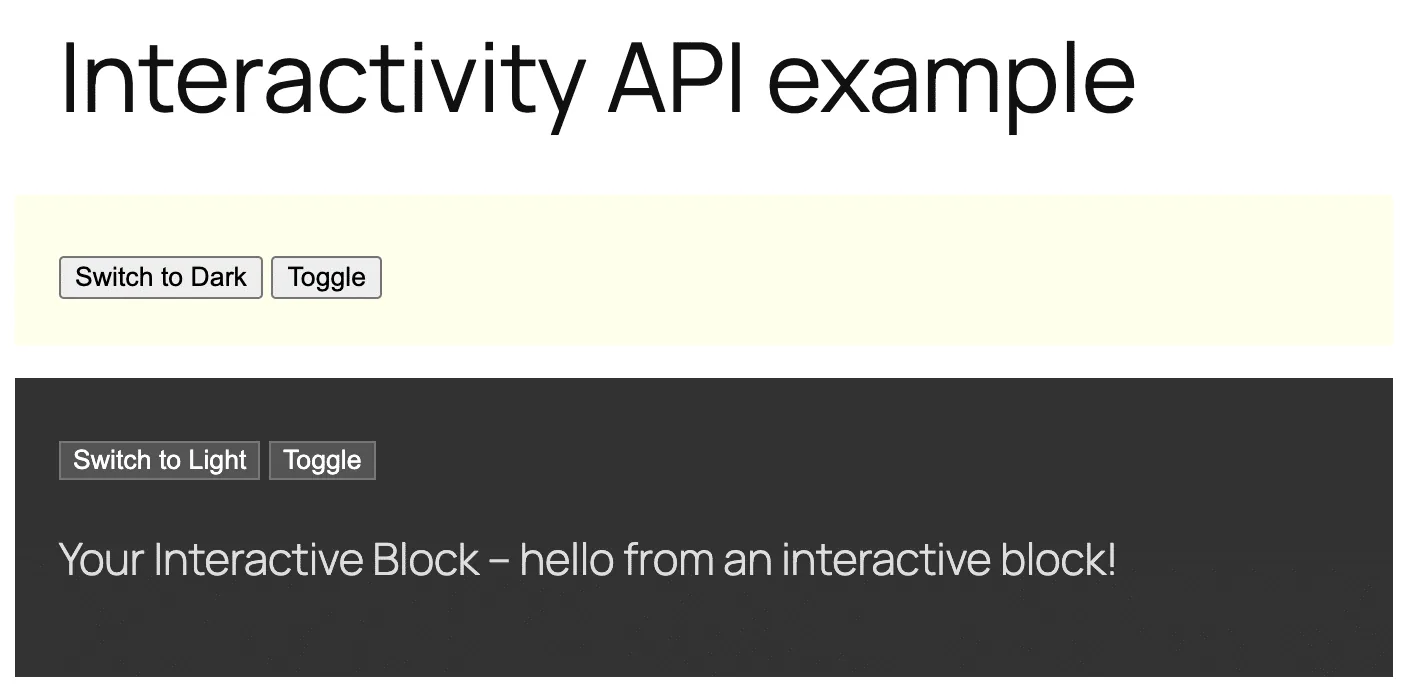
@wordpress/create-block-interactive-template 提供的交互式块示例
现在你已有了一个可供参考的插件,接下来可以更深入地探索交互式块。
交互式块的结构
交互式块的结构与传统块相同,同样需要 package.json、block.json、edit.js 文件和 style.scss 文件。此外,还需要 render.php 文件用于服务端渲染,以及 view.js 文件用于处理前端交互。
下面通过分解启动项目的各个文件,查看交互式块的具体组成部分。
package.json
package.json 文件用于标识 Node 项目、管理脚本,以及在开发过程中管理和安装依赖项。
以下是 create-block-interactive-template 提供的交互式块的 package.json:
{
	"name": "your-interactive-block",
	"version": "0.1.0",
	"description": "An interactive block with the Interactivity API.",
	"author": "The WordPress Contributors",
	"license": "GPL-2.0-or-later",
	"main": "build/index.js",
	"scripts": {
		"build": "wp-scripts build --experimental-modules",
		"format": "wp-scripts format",
		"lint:css": "wp-scripts lint-style",
		"lint:js": "wp-scripts lint-js",
		"packages-update": "wp-scripts packages-update",
		"plugin-zip": "wp-scripts plugin-zip",
		"start": "wp-scripts start --experimental-modules"
	},
	"dependencies": {
		"@wordpress/interactivity": "latest"
	},
	"files": [
		"[^.]*"
	],
	"devDependencies": {
		"@wordpress/scripts": "^30.24.0"
	}
}
其中 scripts 和 dependencies 部分尤为重要:
build:将源代码编译为生产环境用的 JavaScript。--experimental-modules选项支持 WordPress 脚本模块。start:启动开发服务器。同样需要指定--experimental-modules选项。dependencies:包含运行时依赖项,以及最新版的 Interactivity API 包。
block.json
block.json 是 Gutenberg 块的清单文件,用于指定要加载的元数据、媒体、脚本和样式。默认情况下,create-block-interactive-template 生成的 block.json 如下:
{
	"$schema": "https://schemas.wp.org/trunk/block.json",
	"apiVersion": 3,
	"name": "create-block/your-interactive-block",
	"version": "0.1.0",
	"title": "Your Interactive Block",
	"category": "widgets",
	"icon": "media-interactive",
	"description": "An interactive block with the Interactivity API.",
	"example": {},
	"supports": {
		"interactivity": true
	},
	"textdomain": "your-interactive-block",
	"editorScript": "file:./index.js",
	"editorStyle": "file:./index.css",
	"style": "file:./style-index.css",
	"render": "file:./render.php",
	"viewScriptModule": "file:./view.js"
}
以下字段对交互式块至关重要:
apiVersion:值为3,是最新版块 API,支持脚本模块等最新特性。supports:指定块的支持项。"interactivity": true用于添加 Interactivity API 支持。render:指定负责前端渲染的 PHP 文件,用于添加块交互性相关的指令。viewScriptModule:包含交互逻辑的 JavaScript 文件,仅在前端加载,且仅当页面包含交互式块时才会加载。
render.php
render.php 用于构建动态块标记。要使块具有交互性,需添加属性使块的 DOM 元素具备交互能力。
启动项目中的 render.php 文件如下:
<?php
/**
 * PHP file to use when rendering the block type on the server to show on the front end.
 *
 * The following variables are exposed to the file:
 *     $attributes (array): The block attributes.
 *     $content (string): The block default content.
 *     $block (WP_Block): The block instance.
 *
 * @see https://github.com/WordPress/gutenberg/blob/trunk/docs/reference-guides/block-api/block-metadata.md#render
 */

// Generates a unique id for aria-controls.
$unique_id = wp_unique_id( 'p-' );

// Adds the global state.
wp_interactivity_state(
	'create-block',
	array(
		'isDark'    => false,
		'darkText'  => esc_html__( 'Switch to Light', 'your-interactive-block' ),
		'lightText' => esc_html__( 'Switch to Dark', 'your-interactive-block' ),
		'themeText'	=> esc_html__( 'Switch to Dark', 'your-interactive-block' ),
	)
);
?>

<div
	<?php echo get_block_wrapper_attributes(); ?>
	<?php echo wp_interactivity_data_wp_context( array( 'isOpen' => false ) ); ?>
>
	<button
	></button>

<button
		aria-controls="<?php echo esc_attr( $unique_id ); ?>"
	>
		<?php esc_html_e( 'Toggle', 'your-interactive-block' ); ?>
	</button>

<p
	>
		<?php
			esc_html_e( 'Your Interactive Block - hello from an interactive block!', 'your-interactive-block' );
		?>
	</p>
</div>
以上代码的作用如下:
wp_interactivity_state:获取或设置 Interactivity API 存储的初始全局状态。data-wp-interactive:在 DOM 元素及其子元素上启用 Interactivity API。其值必须是插件或块的唯一命名空间。wp_interactivity_data_wp_context():生成data-wp-context指令,为特定 HTML 节点及其子元素提供本地状态。data-wp-watch:在节点创建时以及状态或上下文每次变化时运行回调。data-wp-class--dark-theme:添加或移除 HTML 元素的dark-theme类。data-wp-on--click:同步运行点击事件处理代码。data-wp-text:设置 HTML 元素的内部文本。data-wp-bind--aria-expanded和data-wp-bind--hidden:根据布尔值或字符串值在相应元素上设置 HTML 属性(aria-expanded和hidden)。
view.js
此文件用于定义存储,包含块行为所需的逻辑和数据,包括状态、动作和回调。
以下是启动项目生成的 view.js 文件:
/**
 * WordPress dependencies
 */
import { store, getContext } from '@wordpress/interactivity';

const { state } = store( 'create-block', {
	state: {
		get themeText() {
			return state.isDark ? state.darkText : state.lightText;
		},
	},
	actions: {
		toggleOpen() {
			const context = getContext();
			context.isOpen = ! context.isOpen;
		},
		toggleTheme() {
			state.isDark = ! state.isDark;
		},
	},
	callbacks: {
		logIsOpen: () => {
			const { isOpen } = getContext();
			// Log the value of `isOpen` each time it changes.
			console.log( `Is open: ${ isOpen }` );
		},
	},
} );
store:用于创建和注册块全局状态和逻辑的主要函数。getContext:在动作和回调中使用的函数,用于访问触发事件的 DOM 元素的本地状态(context)。state:定义块的全局响应式数据。actions:包含定义逻辑和改变状态的函数。callbacks:包含响应特定事件或状态变化而自动执行的函数。
内容较多,阅读完以下章节后,一切都会更加清晰。
下面来看 Interactivity API 的核心概念:指令、存储、状态、动作和回调。
Interactivity API 指令
与 Alpine.js 和 Vue.js 等其他前端库类似,Interactivity API 使用特殊的 HTML 属性,使你能够响应页面事件、更新应用状态、操作 DOM、应用样式、处理用户输入等。
这些属性被称为指令,用于将标记与底层 JavaScript 逻辑连接起来。
以下是最常用的指令列表:
| 功能 | 指令 | 描述 |
|---|---|---|
| 激活/命名空间 | data-wp-interactive | 为元素及其子元素激活 API。值必须设置为插件的唯一标识符。 |
| 本地状态 | data-wp-context | 为当前元素及其所有子元素提供本地状态("上下文")。它接受一个 JSON 对象。建议使用 wp_interactivity_data_wp_context() 在 PHP 中设置(通常在 render.php 中)。 |
| 属性绑定 | data-wp-bind--[attribute] | 根据响应式状态或上下文值(布尔值或字符串值)设置 HTML 属性(如 disabled、value)。 |
| 文本修改 | data-wp-text | 设置元素的内部文本内容。仅接受字符串。 |
| CSS 类切换 | data-wp-class--[classname] | 根据布尔值添加或移除 CSS 类。 |
| 行内样式 | data-wp-style--[css-property] | 根据布尔值添加或移除行内样式。 |
| 事件处理 | data-wp-on--[event] | 响应标准 DOM 事件(如 click 或 mouseover)执行代码。 |
| 初始执行 | data-wp-init | 仅在节点创建时运行一次回调函数。 |
| 状态监听 | data-wp-watch | 在节点创建时以及状态或上下文变化时运行回调。 |
| 列表迭代 | data-wp-each | 渲染元素列表。 |
如需完整的指令列表,请查阅 Interactivity API 开发笔记 和 API 参考文档。
全局状态、本地上下文和派生状态
使用 Interactivity API 之前,必须熟悉前端开发中状态管理的基本概念。经常使用 React、Vue 或 Angular 开发的开发者对这些概念应该已经熟悉。以下是一些通用定义,有助于刚接触这些技术的开发者理解。
全局状态
全局状态指可从应用几乎所有组件访问的数据集。以 Interactivity API 为例,全局状态会影响页面上的所有交互式块,使它们保持同步。例如,当用户将产品添加到购物车时,这一操作会反映在购物车块上。
使用 Interactivity API 时,应使用 wp_interactivity_state() 函数在服务端设置全局状态的初始值。在上述启动项目中,该函数在 render.php 文件中的使用方式如下:
// Adds the global state.
wp_interactivity_state(
	'create-block',
	array(
		'isDark'    => false,
		'darkText'  => esc_html__( 'Switch to Light', 'your-interactive-block' ),
		'lightText' => esc_html__( 'Switch to Dark', 'your-interactive-block' ),
		'themeText'	=> esc_html__( 'Switch to Dark', 'your-interactive-block' ),
	)
);
该函数接受两个参数:
- 存储命名空间的唯一标识符。本例中为
create-block。 - 将与现有存储命名空间合并的数据数组(如果存在)。
初始全局状态值随后用于渲染页面。可直接在指令属性值中使用 state 来访问全局状态值:
<button
></button>
store() 函数提供了从 JavaScript 访问全局状态的主要入口,仅限于选定的命名空间。回到启动项目代码,store() 函数在 view.js 文件中的使用方式如下:
import { store, getContext } from '@wordpress/interactivity';

const { state } = store( 'create-block', {
	state: { ... },
	actions: { ... },
	callbacks: { ... },
} );
访问全局状态时,使用 state 属性:
actions: {
	toggleTheme() {
		state.isDark = ! state.isDark;
	},
},
本地上下文
本地上下文是只能由特定组件及其直接子元素访问的数据。WordPress 交互式块为块及其嵌套元素提供独立的状态。
使用 Interactivity API 时,可使用 getContext() 函数访问本地上下文。再看启动项目,当用户点击 Toggle 按钮时,会触发 toggleOpen() 动作,从而访问组件的本地上下文:
actions: {
	toggleOpen() {
		const context = getContext();
		context.isOpen = ! context.isOpen;
	},
},
getContext():获取块的本地状态对象。此对象的属性在组件标记(render.php)中使用wp_interactivity_data_wp_context()函数定义。context.isOpen = ! context.isOpen;:切换组件本地上下文中isOpen属性的值。
派生状态
派生状态指根据现有全局或本地状态动态计算的数据。
例如,view.js 文件中的以下代码:
const { state } = store( 'create-block', {
	state: {
		get themeText() {
			return state.isDark ? state.darkText : state.lightText;
		},
	},
	...
}
该代码在 create-block 命名空间的全局状态内定义了 themeText 派生状态。
get themeText() 不是固定值,而是一个 getter 函数,每次读取 themeText 属性时都会执行。它不应像普通函数那样调用,因为 Interactivity API 会将其视为状态属性,并在其他状态属性值发生变化时自动重新计算。在上述代码中,每当 isDark 属性值发生变化时,themeText 属性值都会重新计算:如果 state.isDark 为 true,则取 state.darkText 的值;否则取 state.lightText 的值。
如需更全面地了解本节所述的概念,请参阅理解全局状态、本地上下文和派生状态。
动作和回调
动作和回调决定了用户交互和状态变化的响应方式。
交互式块的 actions 部分包含响应用户生成的事件而执行的函数。这些函数主要用于修改组件的本地或全局状态。以下是 view.js 文件中的相关代码:
actions: {
	toggleOpen() {
		const context = getContext();
		context.isOpen = ! context.isOpen;
	},
	...
},
- 在这段代码中,
toggleOpen()函数使用getContext()访问触发该动作的块的本地上下文,以切换isOpen属性的值。
同理,也可以访问全局状态:
actions: {
	...,
	toggleTheme() {
		state.isDark = ! state.isDark;
	},
},
toggleTheme()函数直接访问全局state对象,并改变isDark属性的值。
动作通过 data-wp-on--[event] 指令触发。例如,render.php 文件中的按钮定义如下:
<button
	aria-controls="<?php echo esc_attr( $unique_id ); ?>"
>
- 在此 HTML 代码中,
data-wp-on--click属性会在用户点击切换按钮时触发toggleOpen动作。
callbacks 部分包含在依赖数据发生变化时自动执行的函数。这些函数的目的是响应状态变化而产生副作用。
在 create-block-interactive-template 生成的基础项目中,可以找到以下回调:
callbacks: {
	logIsOpen: () => {
		const { isOpen } = getContext();
		// Log the value of `isOpen` each time it changes.
		console.log( `Is open: ${ isOpen }` );
	},
},
logIsOpen函数使用了本地上下文中的isOpen变量。- 回调使用
getContext()获取isOpen的值。 - 每次
isOpen值发生变化时,该函数都会向浏览器控制台输出一条消息。
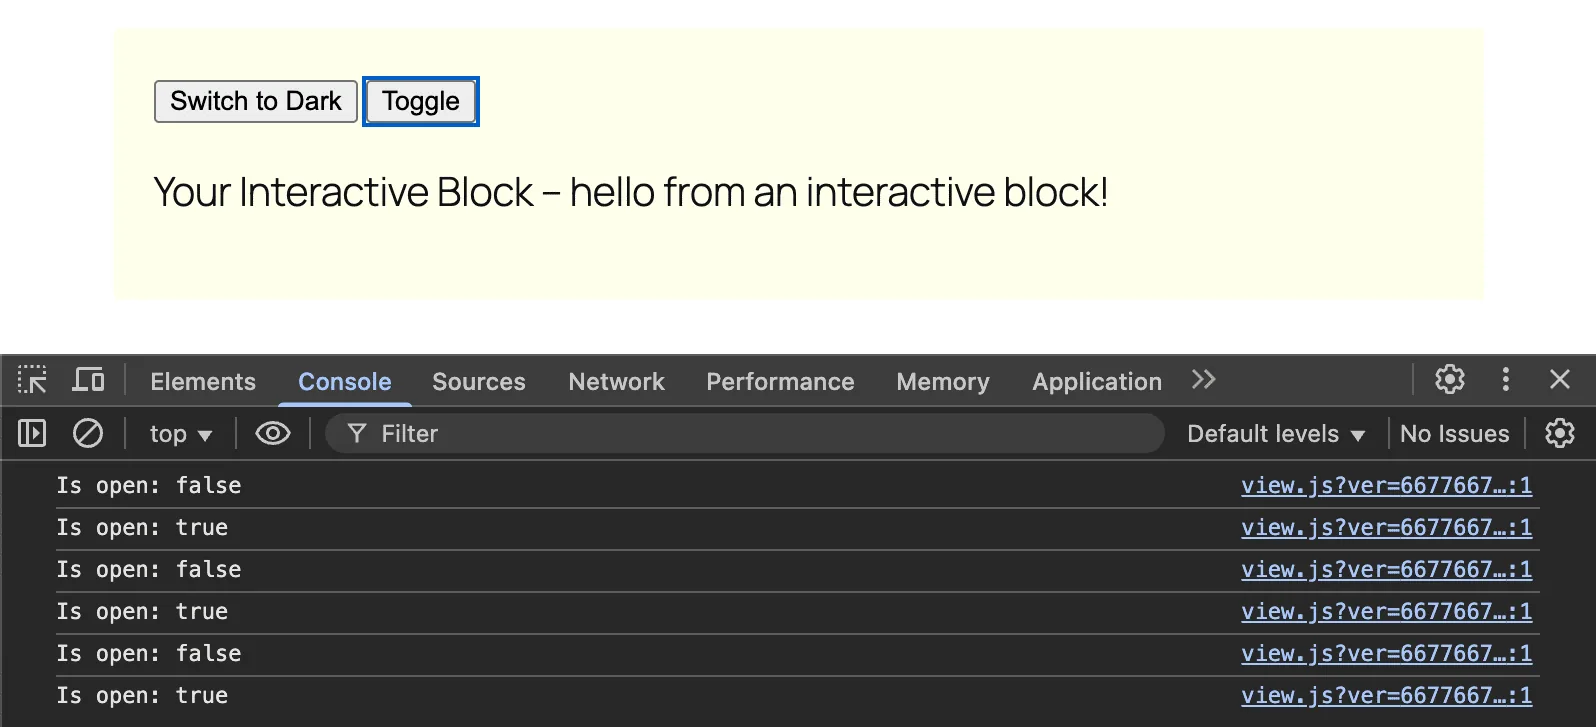
控制台中的消息通知用户本地上下文的变化。
构建交互式块
理论部分已经介绍完毕,现在是时候动手写代码了!在本指南的第二部分,你将学习如何创建一个交互式块,允许用户将产品添加到理想购物车中,并自动更新数量和总计。这是一个演示示例,但希望它能清楚地说明如何使用状态、动作和回调。
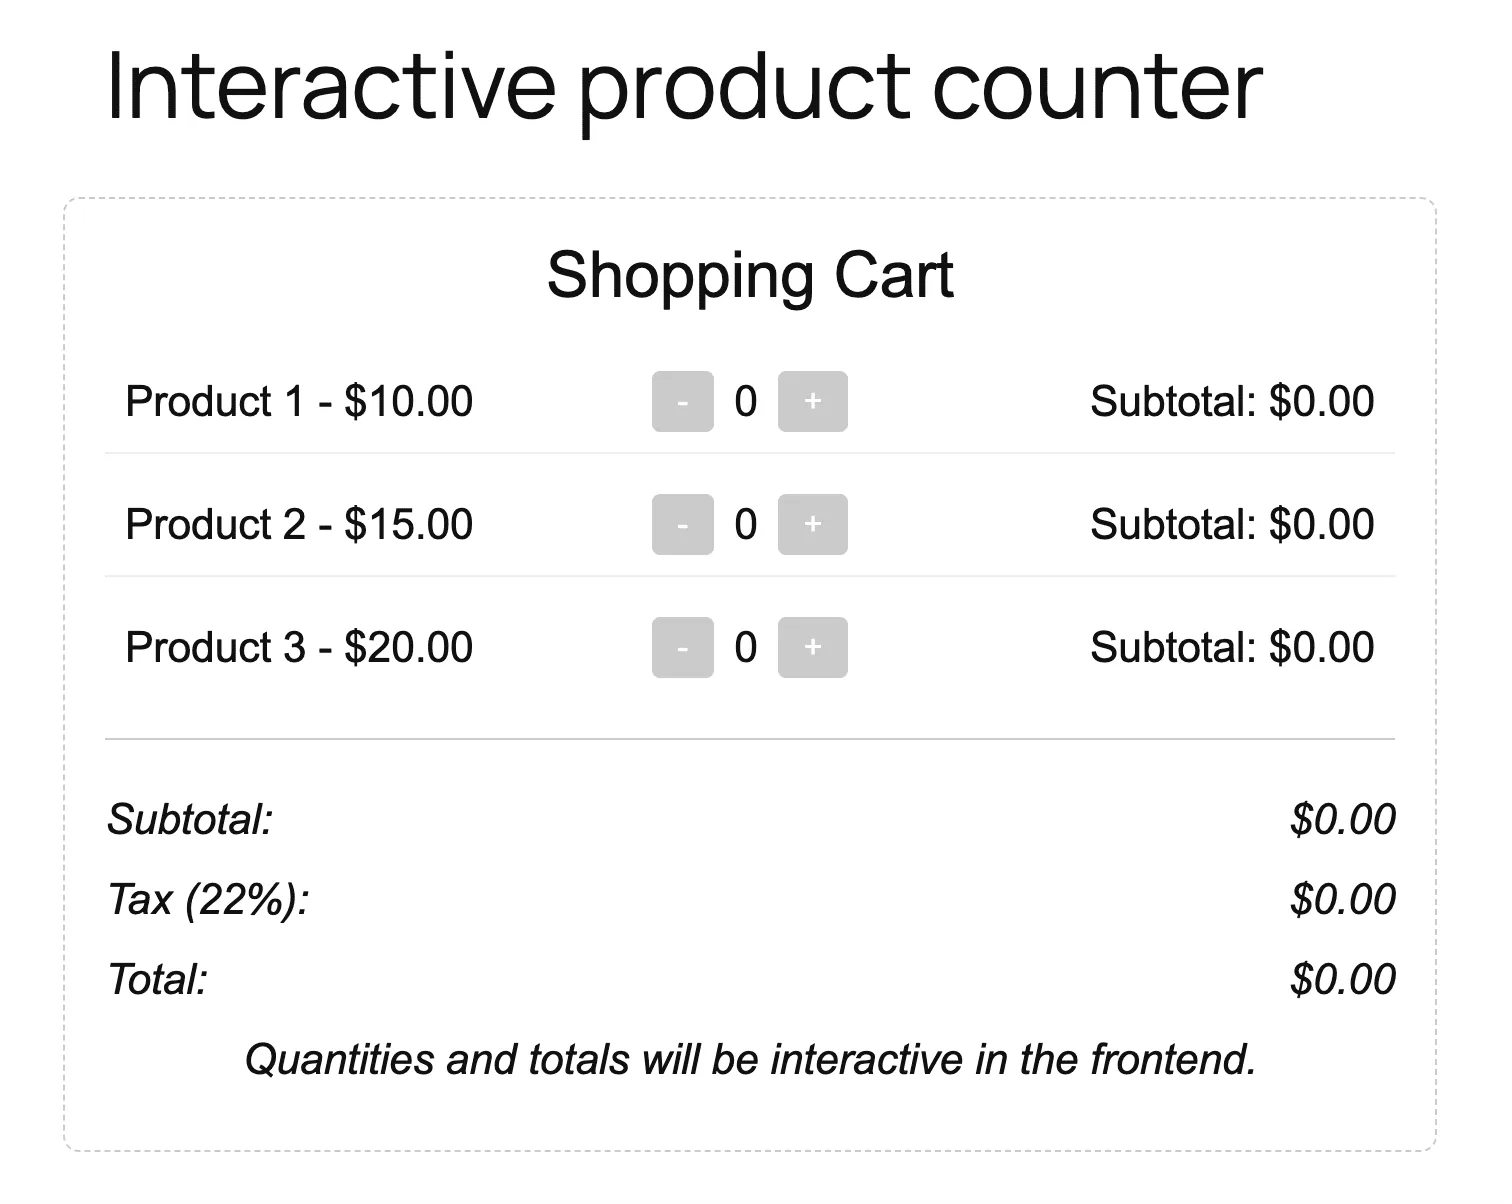
编辑器中的交互式块
我们将使用 create-block-interactive-template 创建一个名为 Interactive Counter 的块。首先,打开命令行工具并输入以下命令:
npx @wordpress/create-block interactive-counter --template @wordpress/create-block-interactive-template
然后,进入新项目目录并运行首次构建。
cd interactive-counter && npm run build
现在在代码编辑器中打开项目。在 /src 目录中查找 block.json 文件,内容应类似于以下内容:
{
	"$schema": "https://schemas.wp.org/trunk/block.json",
	"apiVersion": 3,
	"name": "create-block/interactive-counter",
	"version": "0.1.0",
	"title": "Interactive Counter",
	"category": "widgets",
	"icon": "media-interactive",
	"description": "An interactive block with the Interactivity API.",
	"supports": {
		"interactivity": true
	},
	"textdomain": "interactive-counter",
	"editorScript": "file:./index.js",
	"editorStyle": "file:./index.css",
	"style": "file:./style-index.css",
	"render": "file:./render.php",
	"viewScriptModule": "file:./view.js"
}
edit.js 文件
下一步是创建编辑器中显示的块。修改 /src/edit.js 文件如下:
import { __ } from '@WordPress/i18n';
import { useBlockProps } from '@WordPress/block-editor';
import './editor.scss';

export default function Edit({ attributes, setAttributes }) {
	const blockProps = useBlockProps();
	const products = [
		{ id: 'product1', name: __('Product 1', 'interactive-counter'), price: 10.00 },
		{ id: 'product2', name: __('Product 2', 'interactive-counter'), price: 15.00 },
		{ id: 'product3', name: __('Product 3', 'interactive-counter'), price: 20.00 },
	];

return (
		<div {...blockProps}>
			<h3>{__('Shopping Cart', 'interactive-counter')}</h3>
			<ul>
				{products.map((product) => (
					<li key={product.id} style={{ display: 'flex', justifyContent: 'space-between', alignItems: 'center', marginBottom: '10px' }}>
						<span style={{ flex: 1 }}>{product.name} - ${product.price.toFixed(2)}</span>
						<div style={{ display: 'flex', gap: '10px', alignItems: 'center' }}>
							<button disabled>-</button>
							<span>0</span>
							<button disabled>+</button>
						</div>
						<span style={{ flex: 1, textAlign: 'right' }}>
							{__('Subtotal:', 'interactive-counter')} $0.00
						</span>
					</li>
				))}
			</ul>
			<div style={{ borderTop: '1px solid #ccc', paddingTop: '15px' }}>
				<p style={{ display: 'flex', justifyContent: 'space-between' }}>
					<strong>{__('Subtotal:', 'interactive-counter')}</strong>
					<span>$0.00</span>
				</p>
				<p style={{ display: 'flex', justifyContent: 'space-between' }}>
					<strong>{__('Tax (22%):', 'interactive-counter')}</strong>
					<span>$0.00</span>
				</p>
				<p style={{ display: 'flex', justifyContent: 'space-between' }}>
					<strong>{__('Total:', 'interactive-counter')}</strong>
					<span>$0.00</span>
				</p>
			</div>
			<p>{__('Quantities and totals will be interactive in the frontend.', 'interactive-counter')}</p>
		</div>
	);
}
该代码在编辑器中生成一个自定义块,仅前端具有交互性。关于 /src/edit.js 文件的更多详细信息,请参阅 Gutenberg 块开发指南。
render.php 文件
接下来编辑 /src/render.php 文件。将现有代码替换为以下内容:
<?php
/**
 * Render callback for the interactive-counter block.
 */

$products = [
	['id' => 'product1', 'name' => __('Product 1', 'interactive-counter'), 'price' => 10.00],
	['id' => 'product2', 'name' => __('Product 2', 'interactive-counter'), 'price' => 15.00],
	['id' => 'product3', 'name' => __('Product 3', 'interactive-counter'), 'price' => 20.00],
];

// Initialize global state
wp_interactivity_state('interactive-counter', [
	'products' => array_map(function ($product) {
		return [
			'id' => $product['id'],
			'name' => $product['name'],
			'price' => $product['price'],
			'quantity' => 0,
			'subtotal' => '0.00',
		];
	}, $products),
	'vatRate' => 0.22,
]);
代码功能如下:
- 首先创建产品硬编码数组,每个产品包含 ID、名称和价格。
- 使用
wp_interactivity_state初始化全局状态,第一个参数是存储名称,必须与view.js中使用的名称一致。 - 将产品数组映射为新的
products数组,向原始数组属性中添加数量和小计,这个新数组提供了在view.js中使用的数据结构。 vatRate用于设置税率默认值。
接下来,将以下内容添加到上述代码中:
<div <?php echo get_block_wrapper_attributes(); ?>>
	<h3><?php echo esc_html__('Cart', 'interactive-counter'); ?></h3>
	<ul>
		<?php foreach ($products as $index => $product) : ?>
			<li data-wp-context='{
				"productId": "<?php echo esc_attr($product['id']); ?>",
				"quantity": 0,
				"subtotal": "0.00"
			}'
			data-wp-bind--data-wp-context.quantity="state.products[<?php echo $index; ?>].quantity"
			data-wp-bind--data-wp-context.subtotal="state.products[<?php echo $index; ?>].subtotal">
				<span><?php echo esc_html($product['name']); ?> - $<?php echo esc_html(number_format($product['price'], 2)); ?></span>
				<div>
					<button>-</button>
					<span>0</span>
					<button>+</button>
				</div>
				<span>
					<?php echo esc_html__('Subtotal:', 'interactive-counter'); ?>
					$<span>0.00</span>
				</span>
			</li>
		<?php endforeach; ?>
	</ul>
	<div>
		<p>
			<strong><?php echo esc_html__('Subtotal:', 'interactive-counter'); ?></strong>
			$ <span>0.00</span>
		</p>
		<p>
			<strong><?php echo esc_html__('Tax (22%):', 'interactive-counter'); ?></strong>
			$ <span>0.00</span>
		</p>
		<p>
			<strong><?php echo esc_html__('Total:', 'interactive-counter'); ?></strong>
			$ <span>0.00</span>
		</p>
	</div>
</div>
代码功能如下:
div容器中的get_block_wrapper_attributes()是 WordPress 函数,用于生成块的標準属性。本例中生成了 class 属性"wp-block-create-block-interactive-counter"。data-wp-interactive属性使此块具有交互性。data-wp-init属性触发view.js中定义的init回调。foreach循环为products数组中的每个产品生成一个列表项。data-wp-context定义块的本地上下文。data-wp-bind将data-wp-context.quantity的值绑定到全局state.products[$index].quantity属性。- 下一行同样绑定小计。
- 以下两个按钮通过
data-wp-on--click属性触发decrement和increment动作。 span中的data-wp-text属性根据context.quantity的当前值更新元素内容。
其余代码不言自明,下面来看下一个文件。
view.js 文件
此文件包含交互式块的逻辑。
import { store, getContext } from '@WordPress/interactivity';
store('interactive-counter', {
state: {
get subtotal() {
const { products } = store('interactive-counter').state;
return products
.reduce((sum, product) => sum + product.price * (product.quantity || 0), 0)
.toFixed(2);
},
get vat() {
const { subtotal, vatRate } = store('interactive-counter').state;
return (subtotal * vatRate).toFixed(2);
},
get total() {
const { subtotal, vat } = store('interactive-counter').state;
return (parseFloat(subtotal) + parseFloat(vat)).toFixed(2);
},
},
actions: {
increment: () => {
const context = getContext();
const { products } = store('interactive-counter').state;
const product = products.find(p => p.id === context.productId);
if (product) {
product.quantity = (product.quantity || 0) + 1;
product.subtotal = (product.price * product.quantity).toFixed(2);
context.quantity = product.quantity;
context.subtotal = product.subtotal;
console.log(Incremented ${context.productId}:, { quantity: product.quantity, subtotal: product.subtotal, context });
} else {
console.warn('Product not found:', context.productId);
}
},
decrement: () => {
const context = getContext();
const { products } = store('interactive-counter').state;
const product = products.find(p => p.id === context.productId);
if (product && (product.quantity || 0) > 0) {
product.quantity -= 1;
product.subtotal = (product.price * product.quantity).toFixed(2);
context.quantity = product.quantity;
context.subtotal = product.subtotal;
console.log(Decremented ${context.productId}:, { quantity: product.quantity, subtotal: product.subtotal, context });
} else {
console.warn('Cannot decrement:', context.productId, product?.quantity);
}
},
},
callbacks: {
init: () => {
const { products } = store('interactive-counter').state;
products.forEach((product, index) => {
product.quantity = 0;
product.subtotal = '0.00';
console.log(Initialized product ${index}:, { id: product.id, quantity: product.quantity, subtotal: product.subtotal });
});
},
},
});
该文件为 `interactive-counter` 命名空间定义了存储,管理状态、动作和回调:
store('interactive-counter', { state: { ... }, actions: { ... }, callbacks: { ... }, });
具体来看各部分的作用:
- `state`:定义了三个计算属性(getter):`subtotal`、`vat` 和 `total`。这些函数从全局状态中获取值并计算返回结果。
- `actions`:定义了两个事件处理函数:`increment` 和 `decrement`。这两个函数从全局状态获取 `products` 数组,根据 `context.productId` 从本地上下文获取当前产品,更新产品属性值(`quantity` 和 `subtotal`),并将本地上下文与新值同步。
- `callbacks`:定义了初始化用的 `init` 回调。
下图展示了前端中的交互式块。
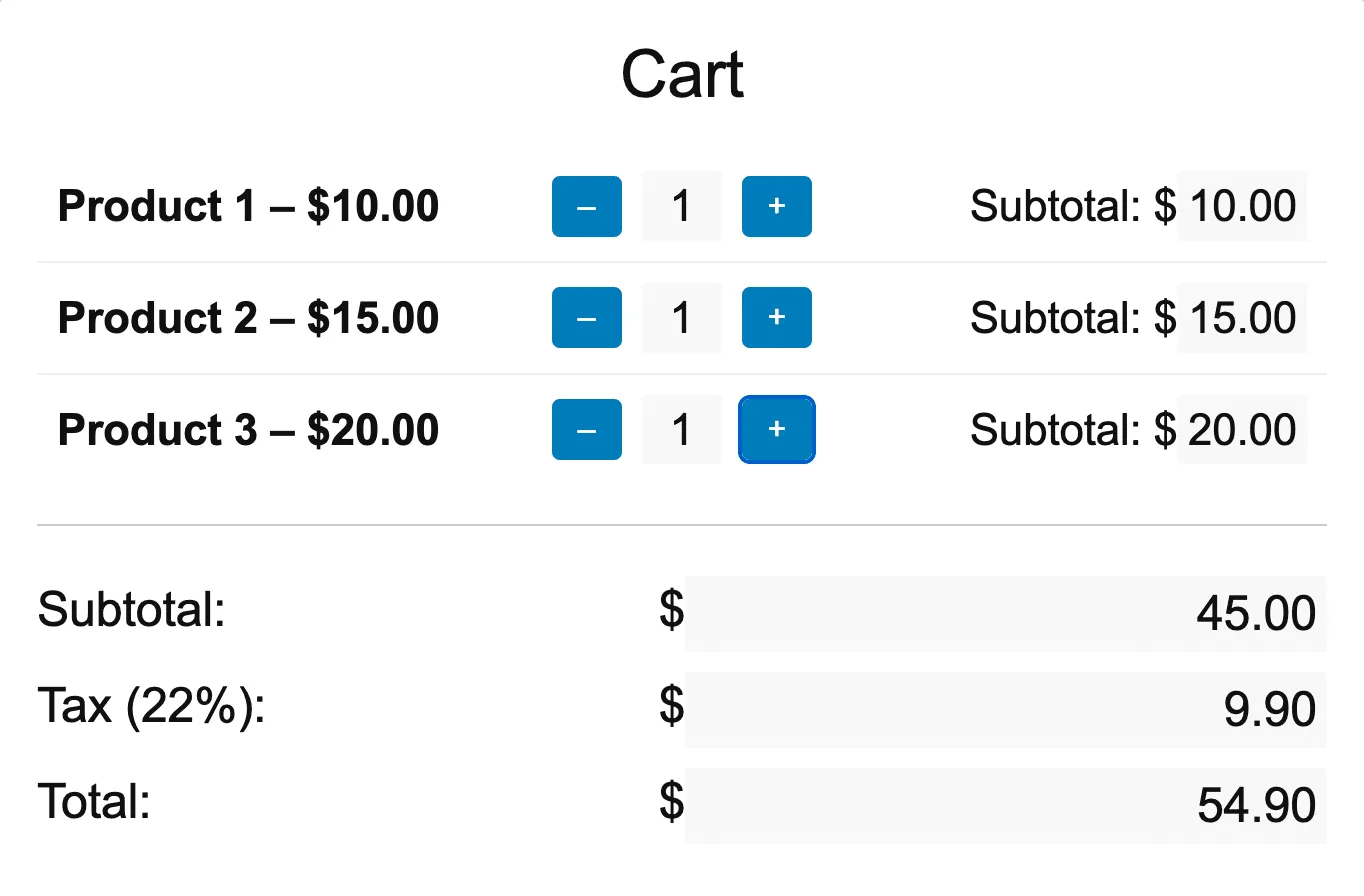
*使用 Interactivity API 构建的交互式计数器*
## 总结
本文介绍了 WordPress Interactivity API 的主要特性,深入探讨了全局状态、本地上下文、指令、动作和回调等关键概念。还学习了如何使用 `@wordpress/create-block-interactive-template` 从头创建交互式块,并通过创建一个与用户输入交互的真实块进行了实践。
希望本指南能提供必要的工具和知识,帮助你使用 WordPress Interactivity API 创建出色的动态交互式网站。
祝编码愉快!